
Outlet and Switch Replacement: The 2026 Homeowner's Guide
July 31, 2026 15 min read
Signs your outlets and switches are worn out, real 2026 costs, the safety non-negotiables, GFCI and smart-switch specifics, and when to stop and call a licensed electrician.
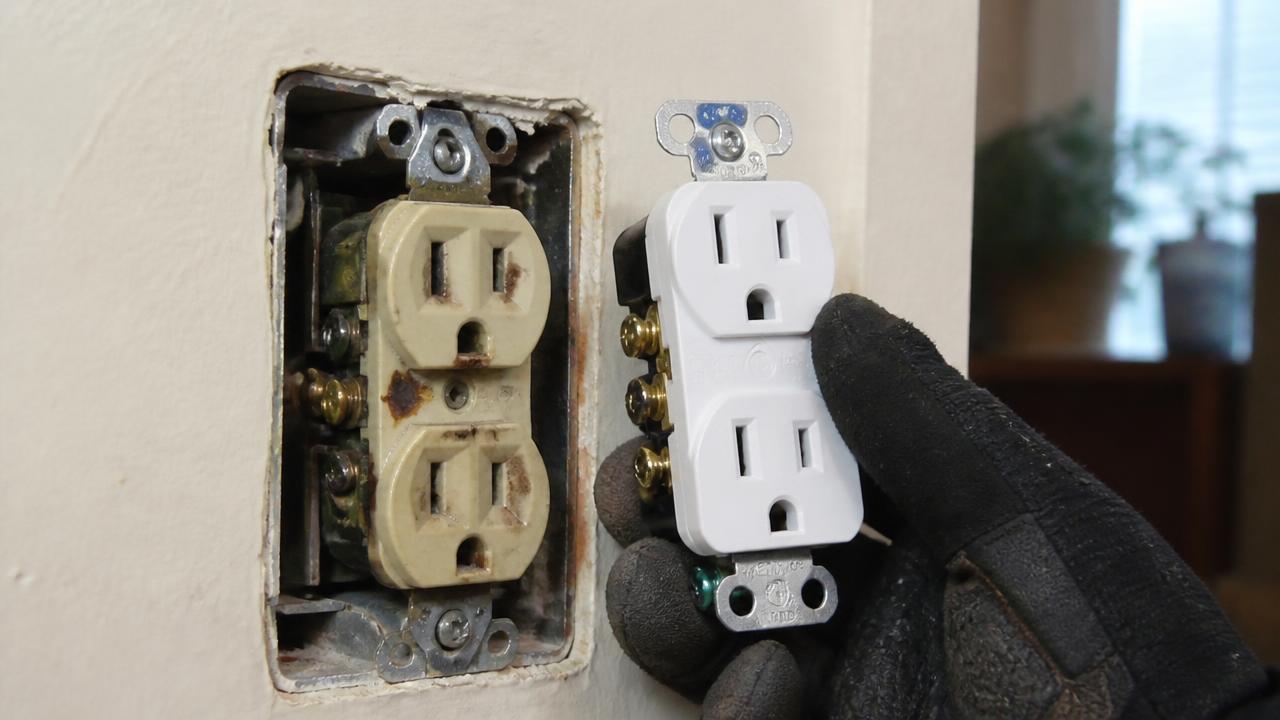
A loose outlet that spits out your plug or a light switch that crackles when you flip it is more than an annoyance. It is a warning. If you are considering an outlets and switch replacement to fix a failing connection or refresh a room's look, you are stepping into the most common electrical project in American homes. But the 2026 home is not the same as it was a decade ago. Aging wiring, smart home demands, and updated local codes mean that what used to be a simple swap now requires a sharper eye and a clearer understanding of when to put down the screwdriver and pick up the phone.
Why Replace Outlets and Switches? (Signs of Wear)
Most people think about replacing outlets and switches when the decor changes. A yellowed plastic faceplate against fresh paint is hard to ignore. But the real reasons to replace these devices run deeper than aesthetics, and ignoring them carries genuine risk.
Physical warning signs demand immediate attention. Discoloration or dark smudges around the slots of an outlet often indicate overheating inside the box. A faceplate that feels warm to the touch when nothing is plugged in is a red flag you should never ignore. Cracks in the plastic body expose live terminals to accidental contact. Buzzing or sizzling sounds from a switch, especially when paired with a flickering light, point to internal arcing that can degrade connections and start a fire.
Functional failures are just as telling. Plugs that droop and fall out of the outlet have lost their internal tension. This creates a loose connection that generates heat every time you use that receptacle. Switches that require excessive force to toggle, or that feel spongy and vague instead of snapping crisply into position, have worn internal contacts. Both conditions mean the device has reached the end of its useful life.
There is no fixed schedule for replacement. A seldom-used outlet in a guest bedroom may last decades without issue. The outlet behind the kitchen counter that cycles through a toaster, coffee maker, and blender every morning wears out much faster. High-traffic areas like kitchens, living rooms, and home offices typically need attention years before other spaces.
The 2026 smart home factor adds another layer. Older outlets lack the USB-C ports that modern devices expect, forcing a tangle of adapters and power bricks. Many smart plugs and home automation modules require a solid, tight connection to function reliably, and a worn-out receptacle will cause them to disconnect or report errors. Replacing an aging outlet with one that includes integrated USB ports or smart capability is no longer a luxury. It is a practical upgrade that matches how we live now.
The Cost of Outlets and Switch Replacement (2026 Pricing)
Understanding the cost of outlets and switch replacement means separating the parts from the labor and knowing where the line falls between a quick DIY job and a project that needs a licensed electrician.
On the DIY side, the parts are inexpensive. A standard 15-amp duplex outlet costs between two and five dollars at any home center. Decora or rocker-style outlets and switches, which offer a cleaner, more modern look, run slightly higher. GFCI outlets, required in kitchens, bathrooms, garages, and outdoor locations, range from fifteen to twenty-five dollars depending on the brand and features. Dimmer switches start around fifteen dollars for a basic rotary model and climb to thirty dollars or more for a smart dimmer compatible with voice assistants. If you already own a basic set of insulated screwdrivers, needle-nose pliers, and a non-contact voltage tester, your out-of-pocket cost for a single replacement is minimal.
Professional service rates follow a different structure. The benchmark for a standard outlets and switch replacement performed by a licensed electrician sits between sixty-five and one hundred twenty-five dollars per device. This price typically covers labor for a straightforward swap where the existing wiring and box are in good condition. The device itself may or may not be included in that figure, so clarify that point when you request an estimate.
Several variables push the cost higher. Three-way switches, which control a light from two locations, involve more complex wiring and take longer to diagnose and replace. Specialty devices like smart dimmers, motion-sensor switches, or tamper-resistant outlets with integrated nightlights cost more for the part and often require additional configuration. Accessibility matters too. An outlet in an unfinished basement with open joists is quick work. The same job in a cramped attic or behind heavy furniture takes longer and costs more.
One critical distinction: replacing an existing outlet or switch is not the same as adding a new one. Moving an outlet to a different wall, splitting a circuit, or running a new home run back to the panel crosses into new installation territory. Those projects start at two hundred dollars and climb quickly, and they almost always require a permit and inspection. If your project involves anything beyond swapping a device in its existing box, you are no longer in simple replacement territory.
Safety First: The Non-Negotiables of Electrical Work
No cosmetic upgrade and no cost savings are worth a trip to the emergency room or a house fire. The safety protocols for electrical work are not suggestions. They are the barrier between you and a lethal shock.
Kill the power at the source. Flipping the wall switch off is not enough. The switch interrupts the flow of current to a light fixture, but the wires inside the switch box remain live. Go to the main electrical panel and locate the correct breaker. If the panel schedule is unlabeled or unclear, plug a lamp into the outlet you plan to replace, turn it on, and flip breakers one by one until the lamp goes dark. Once you identify the correct breaker, tape it off or place a lockout device on it if you have one. Someone else in the house flipping that breaker while you are holding bare wires is a preventable disaster.
Test, then test again. A non-contact voltage tester is a pen-shaped tool that beeps or lights up when held near a live wire. They cost less than twenty dollars and belong in every homeowner's toolkit. Before you remove a single screw from the outlet or switch, hold the tester against the face of the device and confirm it reads live. After you kill the breaker, test the device again to confirm it is dead. Once you pull the device out of the wall, test each wire individually before touching anything with your hands. This is the only way to be certain the circuit is safe.
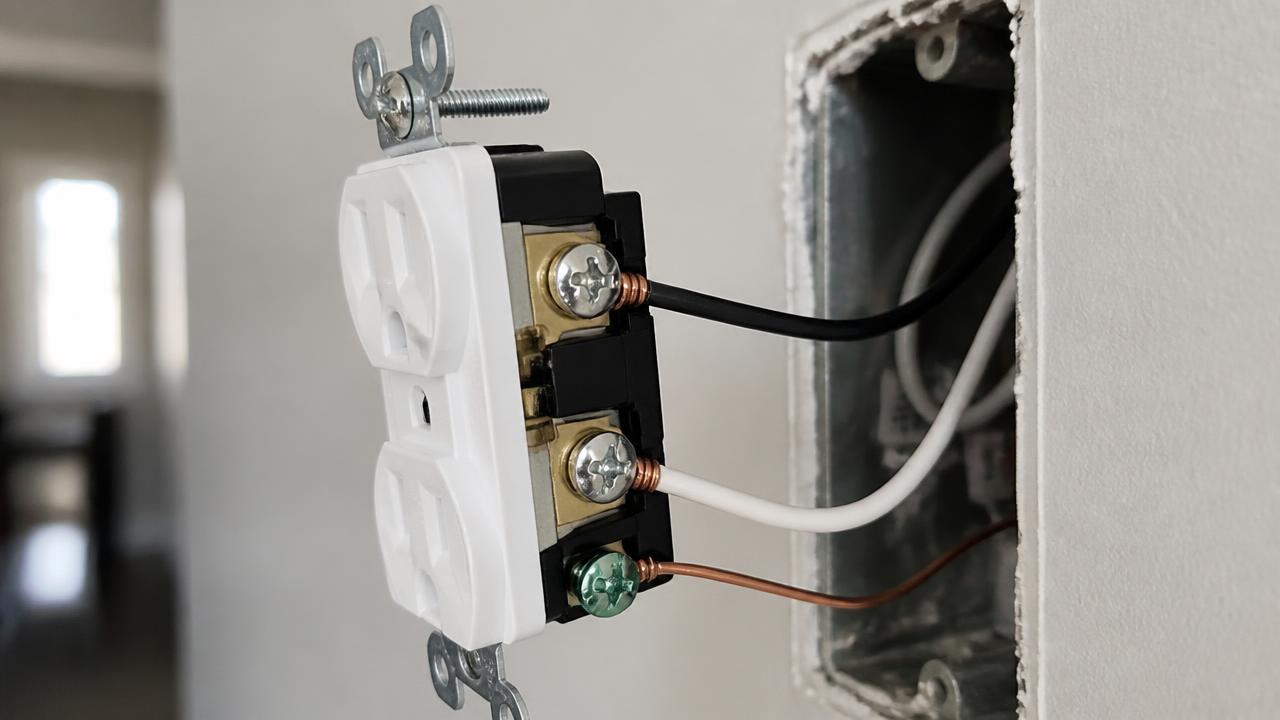
Understand what you are looking at. In standard residential wiring, black or red wires carry the hot current. White wires are neutral and complete the circuit back to the panel. Bare copper or green-insulated wires are the equipment ground, a safety path that directs fault current away from you. Even when the breaker is off, treat every wire with respect. Never touch exposed conductors with bare hands until you have verified they are dead.
Know when to stop. Some wiring configurations are not safe for a homeowner to touch. Aluminum wiring, common in homes built between the mid-1960s and mid-1970s, requires special connectors and techniques to avoid fire hazards. A box with no ground wire present means you cannot simply install a standard three-prong outlet. Multi-wire branch circuits, where two hot wires share a single neutral, can still carry current on the neutral even when one breaker is off. If you open a box and see any of these conditions, stop, replace the faceplate, and call a licensed electrician.
The DIY Process: A Step-by-Step Overview
If you have read the safety section, confirmed your wiring is standard copper with a ground, and feel confident proceeding, the actual replacement process is straightforward. This overview assumes you are replacing a standard outlet or single-pole switch with a new device of the same type.
Start by gathering your tools and materials. You will need a flathead and a Phillips screwdriver, needle-nose pliers, a wire stripper, and your non-contact voltage tester. Have the new outlet or switch ready, along with a new faceplate if the old one is worn or does not match the new device style.
Remove the old device methodically. Unscrew the faceplate and set it aside. Remove the two screws that secure the device to the electrical box. Grip the mounting tabs at the top and bottom of the device and pull it straight out of the box. Pull gently and avoid tugging on the wires themselves. Once the device is clear of the box, take a clear photo of the wiring with your phone. This reference image is invaluable if you get confused later.
Disconnect the wires one at a time. If the wires are wrapped around screw terminals, loosen each screw and unhook the wire. If they are inserted into push-in holes in the back of the device, use a small flathead screwdriver to release the spring clamp or simply cut the wire close to the device and strip a fresh section. Discard the old device.
Connect the new device using the screw terminals, not the push-in connectors. The push-in holes are faster but rely on a small spring that loosens over time. Wrapping the wire clockwise around the screw terminal and tightening it down creates a more durable, lower-resistance connection that will last for decades. Follow the color code without exception: the black hot wire goes to the brass-colored screw, the white neutral wire goes to the silver-colored screw, and the bare or green ground wire goes to the green ground screw. Form a snug clockwise loop with your pliers, hook it over the screw, and tighten firmly.
Reinstall the device carefully. Fold the wires back into the box in a gentle accordion pattern, keeping the ground wire tucked toward the back. Do not force or cram the wires. Secure the device to the box with the two mounting screws, making sure it sits straight and flush. Attach the new faceplate.
Turn the breaker back on and test your work. For an outlet, plug in a lamp or a plug tester. A plug tester with indicator lights will confirm correct wiring and identify any issues like reversed polarity. For a switch, flip it on and verify the light or appliance responds correctly. If everything works, you are done.
Replacing Specific Types of Outlets and Switches
Standard devices are one thing. The moment you encounter a GFCI, a smart switch, a three-way circuit, or an old two-prong outlet, the complexity jumps. These are the scenarios where many DIY guides fall short, and where mistakes carry real consequences.
GFCI outlets protect against ground faults, the dangerous condition where current leaks outside its intended path, such as through water or a person. The critical detail with GFCI replacement is the distinction between the Line and Load terminals. The Line terminals connect to the incoming power from the breaker panel. The Load terminals send protected power downstream to other outlets on the same circuit. If you reverse these connections, the GFCI will not protect itself or the downstream outlets, even though it may appear to work when you press the test button. The new GFCI comes with a sticker covering the Load terminals and a clear instruction sheet. Follow it exactly. After installation, use the test and reset buttons to verify proper function.
Smart switches and outlets bring their own requirement: a neutral wire. Standard single-pole switches often only have two wires in the box, a hot and a switched hot, with no neutral present. Smart devices contain electronics that need a small amount of power to stay connected to your Wi-Fi network, and that power comes from the neutral. If you open a switch box and see only two wires connected to the old switch plus a ground, you likely cannot install a smart switch without running a new cable, which means calling an electrician. Before buying a smart device, remove the existing switch plate and look inside the box to confirm a white neutral wire is present and capped off.
Three-way switches control a light from two locations, such as the top and bottom of a staircase. These switches have three screw terminals instead of two, and one of them, usually a darker screw, is the common terminal. The other two are traveler terminals. The wiring configuration depends on where the switch sits in the circuit, and getting the common wire wrong will prevent the switches from working correctly. If you are not comfortable reading a wiring diagram and tracing wires, three-way switch replacement is a job for a professional.
The two-prong to three-prong conversion is one of the most searched electrical topics, and it is also one of the most misunderstood. An old two-prong outlet has no ground wire. Simply swapping in a three-prong outlet without a ground is a code violation and a safety hazard. It creates a false sense of security because the outlet looks grounded but offers no fault protection. The code-compliant solutions are to run a new ground wire back to the panel, which is a major project, or to install a GFCI outlet in that location and label it with the included sticker that reads "No Equipment Ground." The GFCI will trip if it detects a ground fault, providing a level of shock protection even without a ground wire. This is a legally acceptable workaround, but it must be done correctly with the proper labeling.
Troubleshooting After Replacement
You followed the steps, turned the breaker back on, and something is wrong. Post-installation problems are frustrating, but most have simple causes.
If the outlet is completely dead, the first check is the breaker. A tripped breaker may not look obviously tripped. Push it fully to the off position and then back to on. If the outlet is still dead, turn the power back off and pull the device out. Check that every wire is securely wrapped around its screw terminal and that no bare wire is touching another terminal or the metal box. A single stray strand can cause a short.
Reversed polarity is a common mistake where the hot and neutral wires are swapped. A plug tester will indicate this with a specific light pattern. The fix is simple: turn off the breaker and swap the black and white wires on the outlet screws. Hot to brass, neutral to silver. This matters because many appliances and power strips have polarized plugs and internal fusing that expects correct polarity.
If the breaker trips the instant you turn it back on, you have a dead short. This usually means a ground wire is touching a hot terminal screw. Turn the power off immediately and inspect the box. Look for a bare ground wire that has folded over and made contact with a brass screw. Tuck the ground wire deep into the back of the box, away from all other terminals, and try again.
If you have checked all these issues and the outlet or switch still does not work, the problem may lie upstream. A loose connection in another outlet on the same circuit can kill power to everything downstream. This is where troubleshooting crosses into diagnosis, and a licensed electrician has the tools and knowledge to trace the fault without creating more hazards.
When to Hire a Professional Electrician
There is a clear line between a homeowner maintenance task and a job that requires a licensed professional. Knowing where that line sits protects your home, your family, and your insurance coverage.
In most US jurisdictions, replacing an existing outlet or switch with a like-for-like device does not require a permit. But the moment you modify the circuit, add new wiring, or install a new outlet where one did not exist before, you trigger permit and inspection requirements. A professional electrician handles this process from start to finish, ensuring the work meets the current National Electrical Code and passes inspection the first time.
The old house factor cannot be overstated. Homes built before 1970 often contain wiring with brittle insulation that cracks and crumbles when disturbed. Once that insulation breaks away, you have exposed conductors inside the wall. Non-standard box sizes, cloth-sheathed cable, and the absence of ground wires are all conditions that turn a simple swap into a complex and potentially dangerous project. If your home falls into this category, the safest choice is to let a professional handle every outlets and switch replacement.
Time and value deserve honest consideration. A fifteen-minute DIY swap saves you the service call fee. But one miswired connection can lead to a short that damages an appliance, or worse, a fire that costs thousands to remediate. Professional work comes with a warranty on labor and the peace of mind that the job was done to code. When you weigh the risk against the cost, the math often favors the electrician.
If you are uncomfortable at any point in the process, if you open a box and find wiring you do not understand, or if you need multiple devices upgraded to USB-C, GFCI, or smart-ready models, Morrell Electric is ready to help. A free estimate gives you a clear price before any work begins, and a licensed electrician can complete the job safely, often in less time than a DIY attempt.
Frequently Asked Questions
How much does it cost to replace outlets and switches?
A standard outlets and switch replacement by a licensed electrician typically costs between sixty-five and one hundred twenty-five dollars per device. The part itself is inexpensive, but the labor rate reflects the skill, insurance, and safety protocols a professional brings. Specialty devices like dimmers, smart switches, and GFCIs increase the cost. Adding new circuits or moving outlets to new locations starts at two hundred dollars and goes up from there.
Can I replace an outlet with a switch?
Yes, but it depends on the wiring in the box. An outlet has a hot and a neutral wire. A switch only needs a hot wire and a switched hot going to the light. If the box contains a neutral, you can convert the outlet to a switch and cap off the neutral. If the box lacks a neutral and you need one for a smart switch, the project becomes more involved. This conversion is best handled by an electrician unless you are experienced with circuit wiring.
Do I need an electrician to replace outlets?
You do not always need an electrician. A straightforward swap of a standard outlet or switch with copper wiring and a ground is a manageable DIY project if you follow strict safety protocols. You do need an electrician if the home has aluminum wiring, if there is no ground wire present, if you are installing a GFCI and are unsure about line and load, or if the box contains a multi-wire branch circuit. When in doubt, the cost of a professional is far less than the cost of a mistake.
How often should outlets be replaced?
There is no fixed replacement interval. Outlets and switches should be replaced when they show physical signs of wear such as discoloration, cracking, or warmth, or when they fail functionally by losing plug tension or making noise. High-use areas wear out faster than guest rooms. If your home is more than thirty years old and the outlets are original, a proactive replacement with modern, tamper-resistant devices is a worthwhile safety upgrade.
Conclusion
An outlets and switch replacement sits at the intersection of routine home maintenance and serious electrical work. The parts are cheap, the process is well-documented, and a careful homeowner can handle a basic swap in fifteen minutes. But the 2026 home brings complications that a 1990s guide never anticipated: smart devices that need a neutral, aging wiring that crumbles when disturbed, and codes that demand GFCI protection and proper grounding.
Safety is the thread that runs through every decision. Test before you touch. Respect the color code. Know when the wiring in your walls is beyond your skill level. A successful DIY replacement is satisfying and saves money. A project that goes wrong costs far more than a service call ever would. If your home has old wiring, if you need multiple devices upgraded, or if you simply want the confidence that the job was done right, Morrell Electric is your local resource for professional outlets and switch replacement. Reach out for a free estimate and let a licensed electrician handle the work while you enjoy the results.
Have a project to talk through?
Free estimates from a licensed Prescott Valley electrician.